![]()
My
Computer / Windows Explorer
File and Folder Management
Learning Outcome:
By the end of this module the learning will be able to:
*Note that some screen captures exist from Windows 2000, the functionality of Windows XP file management remains the same.*
Page Contents

Understanding Drive Icons
DEFINITION:
DRIVE - A storage space for digital information. Drives may be located within the computer you are using or located elsewhere, accessed via network cabling (or in some cases via wireless network connections). Drive storage space can be fixed within the computer (often described as hard drives) or can be removable (floppy disks CDRoms) so that the files can be moved from one computer to another.
| Types of Drives and their related Icons as used in My Computer | |
 |
Hard drive that is located on your computer. Typically, C: Drive is used for program files and settings. Typically, D: Drive is used to store data. |
 |
A drive for removable compact disks, located on your computer. May be a CDRom drive (Read only), a CD-R Drive (Read/Write - Recordable CD) or a DVD (Read only digital video disk) Drive. The laptops provided to architectural technology students contains a CD-R drive, designated as E: Drive. |
 |
A networked drive. This drive is NOT located inside the computer you are working on - it is located elsewhere, accessed via network cabling (or in some cases via wireless network connections). A User Name and Password are typically required to access the information stored on the drive. Within the Architectural Technology program at Sheridan, the following designations are typically used for networked drives; O: Drive - a personal storage space for your own work. The O: drive also This drive is protected by your user name and password. THIS IS YOUR ONLY SECURITY FROM OTHERS ACCESSING YOUR FILES _ DO NOT SHARE YOUR LOGIN INFORMATION WITH ANYONE!!! V: Drive - a distribution drive, used by faculty to distribute files to students. This is a read-only drive - meaning that you can copy files from the drive to another location (such as onto your laptop). But you cannot copy files onto the V: drive - nor can you move or delete files on the V: drive. W: Drive - a submission drive, used to submit files to faculty. Each class has it's own, unique submission drive. Typically, instructors will create a folder on the W: drive - be sure to submit your files to the correct location. Once you have copied a file to the submit drive, you cannot move, rename or delete it. Also, you cannot overwrite a file by copying another file with the same name. The O:, V: and W: networked drives have to be setup on your laptop using a process called mapping. Click here for instructions on mapping. |
 |
A networked drive that has been setup on the local computer - but the network connection is not active. |
 |
A floppy drive located on your computer. Typically takes 3-1/2" floppy disks which can store about 1.5 Mb of files. The laptops provided to architectural technology students do not contain floppy drives. (but files can be burned onto a CD using the CD_R drive in the laptops). |
File and Folder Viewing Options
|
Viewing Options |
|
 |
Large Icons |
 |
Small Icons (List view is simlar) |
 |
Details - note that the size and type of files is shown, along with the date that the file was last modified. The width of the detail columns can be adjusted by dragging the edge of the column in the title area. |
Understanding the Folder View
DEFINITIONS:
DRIVE - A storage space for digital information. Drives can contain Folders and Files.
FOLDER - A storage area located on a drive. Folders can contain other folders (known as sub-folders) as well as files. Folders are used to organize your data into logical storage areas - similar to using file folders in a file cabinet to organize a lot of paperwork.
FILE - An electronic "document". Files may be used to run application programs (such as AutoCAD or Word) or they may contain data created using the application programs (such as an AutoCAD Drawing or a Word Document).
Creating New Folders
|
|
Open My Computer |
 |
Select Folder View then select the Drive or Folder in which you wish to create the new folder |
 |
Choose File -> New -> Folder |
 |
Give the Folder a name |
 |
A new folder has been added to the currently open folder |
Renaming Folders and Files
|
|
Open My Computer |
|
Select Folder View then open the Folder which contains the File or Folder that you wish to rename |
 |
Select the Folder or File to be renamed (#1 in illustration), right click then choose rename. |
 |
Type the new name |
 |
The Folder is renamed Note: If you are renaming a file, it will not be displayed in the Folder Area |
Copying or Moving Files of Folders from One Location to Another
|
|
Open My Computer |
 |
Select Folder View then expand the Folder tree so that you can see the Folder where the file or folder will be copied to. ie.You need to be able to see the destination folder in the Folder Area before you select the file to be copied. In this example we will be copying a file into the Aardvark Folder - it is now visible in the Folder Area |
 |
In the Folder Area, find and open the Folder which contains the File or Folder that you wish to copy. Select the File or Folder that you wish to copy. |
 |
If the Folder where the file is to be copied is not currently showing in the Folder Area, use the Folder Area Scroll Bar to make the desitination Folder visible. DO NOT PICK THE DESTINATION FOLDER WITH THE MOUSE - You just want to see it in the Folder Area. The purpose of this step is to have visible; |
 |
Using the RIGHT mouse button (NOT The Pick Button), drag the file to the destination folder. |
 |
Release the right mouse button then use the pick button (the left mouse button) to choose Copy or Move |
 |
Open the destination folder to verify that it has worked |
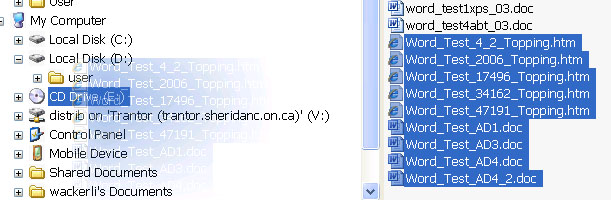
Choosing Multiple Files and/or Folders
When performing file/folder management activities such as copying, moving or deleting, it is useful to be able to work with groups of files and/or folders, rather than individual ones. Choosing multiple files and/or folders involves using the mouse and keyboard in combination.
| To choose a continouous List of Files and/or Folders | |
 |
Step 1 Step 2 Step 3 |
| To choose a non-continuous Group of Files and/or Folders | |
 |
Step 1 Step 2 Step 3 - 6 Step 3 |
Deleting Files or Folders
| Deleting - Method 1 | |
|
|
Open My Computer |
|
Select Folder View then open the Folder which contains the File or Folder that you wish to delete |
 |
Select the Folder or File to be deleted, RIGHT CLICK then choose Delete. Alternatively, you can select the File then use the Delete Key on the keyboard. |
 |
Confirm that you want to delete the file - i.e. mone it to the Recycle Bin |
| Deleting - Method 2 | |
|
|
Open My Computer |
|
Select Folder View then open the Folder which contains the File or Folder that you wish to delete |
 |
If it's not visible, use the Folder Area scroll bar to display the Recycle Bin
|
 |
Select the Folder or File to be deleted, right click then drag and drop the folder or file into the Recycle Bin. Choose Move |
Restoring Files or Folders from the Recycle Bin
| Deleting - Method 2 | |
|
|
Open Recycle Bin |
 |
Select File or Folder then select Restore Note the Date Deleted and Original Location of the Files and Folders. |
There are many ways in which the Files and Folders displayed within the My Computer window can be customized. Two useful options are;
| Universally apply the same File View to all Folders | |
|
|
Open My Computer |
 |
Choose Folder View then Choose the File View that you want to be applied to all folders. |
 |
Select Tools -> Folder Options |
 |
Choose the View Tab then select Like Current Folder |
 |
Choose Yes |
| Display File Extensions for Known File Types | |
|
|
Open My Computer |
 |
Note in this example, the file CAD5155.Q1 has the file extension (the .Q1) shown. The other files do not have their file extension shown because they are known file types. It is often useful to have the file extension visible for all files. |
|
Select Tools -> Folder Options |
 |
Choose the View Tab. UNCHECK 'Hide file extensions for known file types' APPLY the changes |
 |
The file extension are now shown. Note that the file TEST1 does not have a file extension - it's not a requirement but data files for specific applications typically have unique extensions. |
| File Extensions for Popular Application Software Programs | |
| AutoCAD | .dwg (example Plan.dwg) |
| Microsoft Word | .doc (example Report.doc) |
| Microsoft Excel | .xls (example Spreadsheet.xls) |
| Microsoft Powerpoint | .ppt (example Presentation.ppt) |
| Photoshop | .psd (example Drawing.psd) |
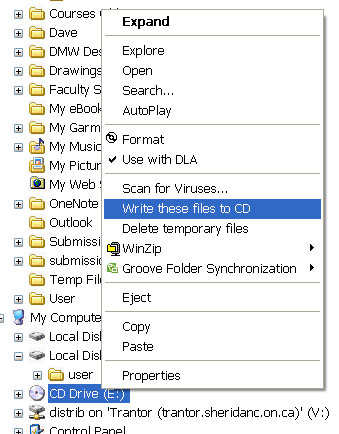
 |
 |
|
|
|
 |
Zipping files compresses file size, and
combines multiple files into a single file for ease of transfer.
To zip files, In My Computer / Windows Explorer select the files to be zipped. Right-click, add-to zip. Name the zip and select OK. The file is saved with a *.zip extension. |
|
|
The contents of a zip file can be
displayed by double clicking on the zip file in My Computer.
Files can be extracted from zip file by selecting the files and dragging them to My Computer or choose "Extract". |
  |
PROCESS: |